Sport

How to Photograph Surfing and Windsurfing

(All images copyright Michael Berkeley Photography - no reproduction without permission)

Surfing and windsurfing offer fantastic opportunities for dramatic action images.

I have photographed windsurfing on a couple of occasions at Kimmeridge Bay in Dorset and at Daymer Bay on the Camel Estuary in Cornwall; and have photographed surfing at Polzeath and at Praa Sands in Cornwall – and briefly on Bondi Beach in Sydney, where wetsuits weren’t needed (see below).

(Nikon D500; 70-210mm at 210mm - f/8; 1/1250th sec; ISO 100)

(Nikon D500; 70-210mm at 210mm - f/8; 1/1250th sec; ISO 100)

Every trip to the beach for photographing surfing and windsurfing starts with good planning - and for that you need to know when the wind and the waves are going to provide the best conditions. While I am sure there are others, I am told that the website Surf Reports is good for surfing conditions, and a friend of mine who frequently photographs windsurfers uses big salty.com before heading down to Avon and Southbourne beaches near Bournemouth. These websites give a detailed forecast for the next 7 days for all the main surfing and windsurfing beaches in the UK and are designed for the practitioners. Tideschart.com has also been highly recommended for both the UK and around the world – it provides a lot of information about tides and includes water temperature, weather and the best fishing times.

(Nikon D80; 300mm f/4 at 300mm - f/4.5; 1/1250th sec; ISO 200)

(Nikon D80; 300mm f/4 at 300mm - f/4.5; 1/1250th sec; ISO 200)

When you get to the beach, the first issue to address is where to stand to take the pictures.  The windsurfers at Kimmeridge and Daymer Bay were sailing across the bay and back, parallel to the beach; whereas the surfers were catching the waves as they came into the beach.

This meant that I positioned myself on the rocks at one end of the bay for the windsurfing, so that the windsurfers were coming directly towards me.  For the surfing, I stood on the beach directly opposite the surfers for most of the time, but also moved to the rocks at one side of Polzeath beach to get an oblique angle as the surfers came in.

(Nikon D700; 200-500mm f/5.6 at 500mm - f/5.6; 1/2000th sec; ISO 200)

(Nikon D700; 200-500mm f/5.6 at 500mm - f/5.6; 1/2000th sec; ISO 200)

The light of course had a bearing on this.  Taking photographs directly into the sun can lead to dramatic images but, more likely, the glare of the light will distract from the surfers, who will be in silhouette (see photo above).

(Sony A9II; 200-600mm at 600mm - f/6.3; 1/640th sec; ISO 125)

(Sony A9II; 200-600mm at 600mm - f/6.3; 1/640th sec; ISO 125)

I have found that a sunny day is better – the colours just pop, making the images more dramatic.  In terms of action, the photo above has more impact, but the colours transform the photo below.

(Sony A9II; 200-600mm at 594mm - f/7.1; 1/1250th sec; ISO 125)

(Sony A9II; 200-600mm at 594mm - f/7.1; 1/1250th sec; ISO 125)

Photographing in the ‘golden hour’ – that time before sunset when the light is softer (I don’t get up early enough for the golden hour after sunrise!) – can also give good results.  The image below was taken just after 5:00pm in the middle of October.  As well as highlighting the windsurfer’s face, the angle of the sun has darkened the background, making the windsurfer stand out.

(Nikon D500; 200-500mm at 500mm - f/5.6; 1/2000th sec; ISO 560)

(Nikon D500; 200-500mm at 500mm - f/5.6; 1/2000th sec; ISO 560)

I set out my ‘standard’ camera settings in my first blog: Getting into Sport and Music Photography.  For surfing and windsurfing, I normally set the aperture wide-open, to create a shallow depth of field; a fast shutter speed (around 1/1000th second) to freeze the action (particularly the water); and the ISO set to Auto, all the time ensuring that the exposure is right for the face.

I use continuous focus and tracking, and Continuous (High) for frame rate, so that there is a choice of images when selecting the ‘decisive moment’.  

As with all my sport photography, I endeavour to ensure that the surfer/windsurfer’s face is visible in the picture, so that they are recognisable – it’s better still if they are showing some emotion, but in most cases they are simply concentrating.

(Nikon D500; 200-500mm at 320mm - f/5.6; 1/2500th sec; ISO 320)

(Nikon D500; 200-500mm at 320mm - f/5.6; 1/2500th sec; ISO 320)

A long lens is essential.  When photographing the surfers from Polzeath beach  – and trying to keep my feet dry – the surfers were a good 100m offshore.  Moreover, I had to shoot through the body boarders and novices having surf lessons, so the long lens was normally at its longest focal point.  I used a 200-500mm on the first occasion (on my Nikon D500), and a 200-600mm on the second (when I had changed to a Sony A9II). When windsurfers are closer to the beach, I would be able to use the 200mm end of the zoom.

(Sony A9II; 200-600mm at 600mm - f/6.3; 1/1000th sec; ISO 125)

(Sony A9II; 200-600mm at 600mm - f/6.3; 1/1000th sec; ISO 125)

The other surfers were not the only problem.  Shooting from this level meant that sometimes the closer waves obscured the surfers further out and also the horizon was visible (see above).  This could be considered distracting, particularly when part of the surfer breaks the horizon.  If the horizon is in the picture, it is essential that it is level – it’s the first thing I check when I get the photos into Lightroom.

(Sony A9II; 200-600mm at 588mm - f/7.1; 1/1250th sec; ISO 125)

(Sony A9II; 200-600mm at 588mm - f/7.1; 1/1250th sec; ISO 125)

By moving to the rocks to one side of the beach, I was able to get higher and therefore – comparatively speaking – almost look down on the surfers, removing the distraction of the horizon (see above).  Normally, with sport photography, I advocate getting down as low as possible, as this makes the athlete look more ‘heroic’, but this is an exception to the rule.

(Sony A9II; 200-600mm at 600mm - f/6.3; 1/2500th sec; ISO 500)

(Sony A9II; 200-600mm at 600mm - f/6.3; 1/2500th sec; ISO 500)

As with all sport, the more you understand what is going on, the easier it is to capture the essence of the sport and the easier it is to anticipate what is going to happen.  I can’t claim to be an expert in surfing or windsurfing, having done neither myself, so I use my instincts to capture the key moments of drama.  I find that this is often when the surfer is on the crest of the wave or the windsurfer airborne (see above). For the windsurfer, this is often as they hit a wave on their way out …

(Nikon D500; 200-500mm at 380mm - f/5.6; 1/2000th sec; ISO 360)

(Nikon D500; 200-500mm at 380mm - f/5.6; 1/2000th sec; ISO 360)

The normal rules of photographic composition apply and the shapes in the water and spray should be exploited to create dramatic images (see above).  Where possible, it is useful to show the height of the waves to set the action into its natural environment, even though the waves in Cornwall may not be the scale of those in places like Hawaii…

(Nikon D500; 200-500mm at 500mm - f/5.6; 1/2500th sec; ISO 200)

(Nikon D500; 200-500mm at 500mm - f/5.6; 1/2500th sec; ISO 200)

It is also possible to use groups of windsurfers to produce patterns.  In the photo below, the focus in on the windsurfer in front, with the other two blurred – the receding perspective provides shape to the image.

(Nikon D500; 200-500mm at 500mm - f/5.6; 1/2000th sec; ISO 500)

(Nikon D500; 200-500mm at 500mm - f/5.6; 1/2000th sec; ISO 500)

It is fun to try something a bit different and produce an image that is almost abstract, where the waves obscure the surfer and only give a glimpse of their face - breaking the ‘rules’ I have set out above. I love the movement in the image below, with the hint of the board and the hand hanging down. The surf itself provides the drama …

(Nikon D500; 200-500mm at 460mm - f/5.6; 1/2000th sec; ISO 180)

(Nikon D500; 200-500mm at 460mm - f/5.6; 1/2000th sec; ISO 180)

One final piece of advice: it makes sense to look after your camera equipment by the sea.  If there is an onshore wind, you could get spray and saltwater on your lens.  I try to avoid pointing the camera directly into the wind in these circumstances until I want to take photographs.  I certainly wouldn’t consider changing lenses unless I am absolutely sure that there is no risk that sand won’t get into the camera mechanics.

I have always thoroughly enjoyed photographing surfing and windsurfing.  It may have had something to do with the fact that the surfers were not taking part in a competition, but doing it for fun – and, in Cornwall, I was on holiday.  If you do a bit of research on the internet to see if the weather conditions are going to be good for surfing and/or windsurfing, you can just go down to the beach and have a blast …


If you have enjoyed this blog or if you have any questions/comments, please leave a message in the comments box below.

How to Photograph Track Cycling

(All images copyright Michael Berkeley Photography - no reproduction without permission)

Photographing track cycling was a very different challenge for me because I am primarily used to photographing sport outdoors - cricket, football, polo etc - or, if indoors, with consistent light, such as basketball and ice hockey. This was altogether different - and very exciting!

Picture 1.jpg

My experience of track cycling comes from 2 visits to Lee Valley VeloPark on Queen Elizabeth Olympic Park in London in 2017 and 2018.  I had been given a photo pass for the Six Day London event and this gave me access to the photographers’ positions at the end of the finishing straight and also trackside access.

The Six Day Series website promises high octane action: 

“The lights get turned down and the music turned up, as Six Day Cycling combines the very best in track cycling with an incredible party atmosphere. Expect the action to come thick and fast as our track centre DJ keeps the party going before, during and after the racing.”

(Nikon D500; 200-500mm at 200mm; f/5.6; 1/320th sec; ISO 12,800)

(Nikon D500; 200-500mm at 200mm; f/5.6; 1/320th sec; ISO 12,800)

There is plenty of variety too, with events including the Madison (cycling in pairs); the Elimination (last one out); the Derny (each cyclist follows a moped); the 200m time trial (head to head); and the Keirin (all behind a single moped).

There is a great atmosphere and the audience is whipped up to a fever pitch of excitement. The party atmosphere is partly generated by the dramatic lighting, which of course makes it all the more interesting for the photographer.

(Nikon D500; 18-55mm at 55mm; f/5.6; 1/60th sec; ISO 2800)

(Nikon D500; 18-55mm at 55mm; f/5.6; 1/60th sec; ISO 2800)

I set out my ‘standard’ settings in my blog Getting into Sport and Music Photography.  A high proportion of my sport images use a wide-open aperture to give a shallow depth of field, in order to separate the action and point(s) of interest from the foreground and background.  While I did of course do this at the cycling, I found panning a more fruitful technique (see my blog on How to Photograph Speedway for more information on panning).

(Nikon D500; 70-210mm at 70mm; f/4; 1/80th sec; ISO 1800)

(Nikon D500; 70-210mm at 70mm; f/4; 1/80th sec; ISO 1800)

I used a Nikon D500 on both visits and I had a Nikon 200-500mm f/5.6 lens at both too.  In 2017, however, I had an 18-55mm f/3.5-5.6 lens and a 70-210mm f/4-5.6 lens.  In the challenging conditions, these struggled to get enough light into the camera. When I returned a year later, I was better equipped with a 24-70mm f/2.8 and a 70-200mm f/2.8.

One benefit of an event like this is that there is plenty of opportunity to try different positions, angles, settings etc.  The races last for some while and there are therefore a large number of laps.  Although the basic premise is the same – riding around the track in the same direction in every race – the different disciplines bring different characteristics to capture.

(Nikon D500; 70-210mm at 70mm; f/5; 1/320th sec; ISO 11,400)

(Nikon D500; 70-210mm at 70mm; f/5; 1/320th sec; ISO 11,400)

In the Madison, for example, riders competing in pairs use a ‘hand-sling’ to catapult their partner forwards when they are handing over the turn to race – see photo above. 

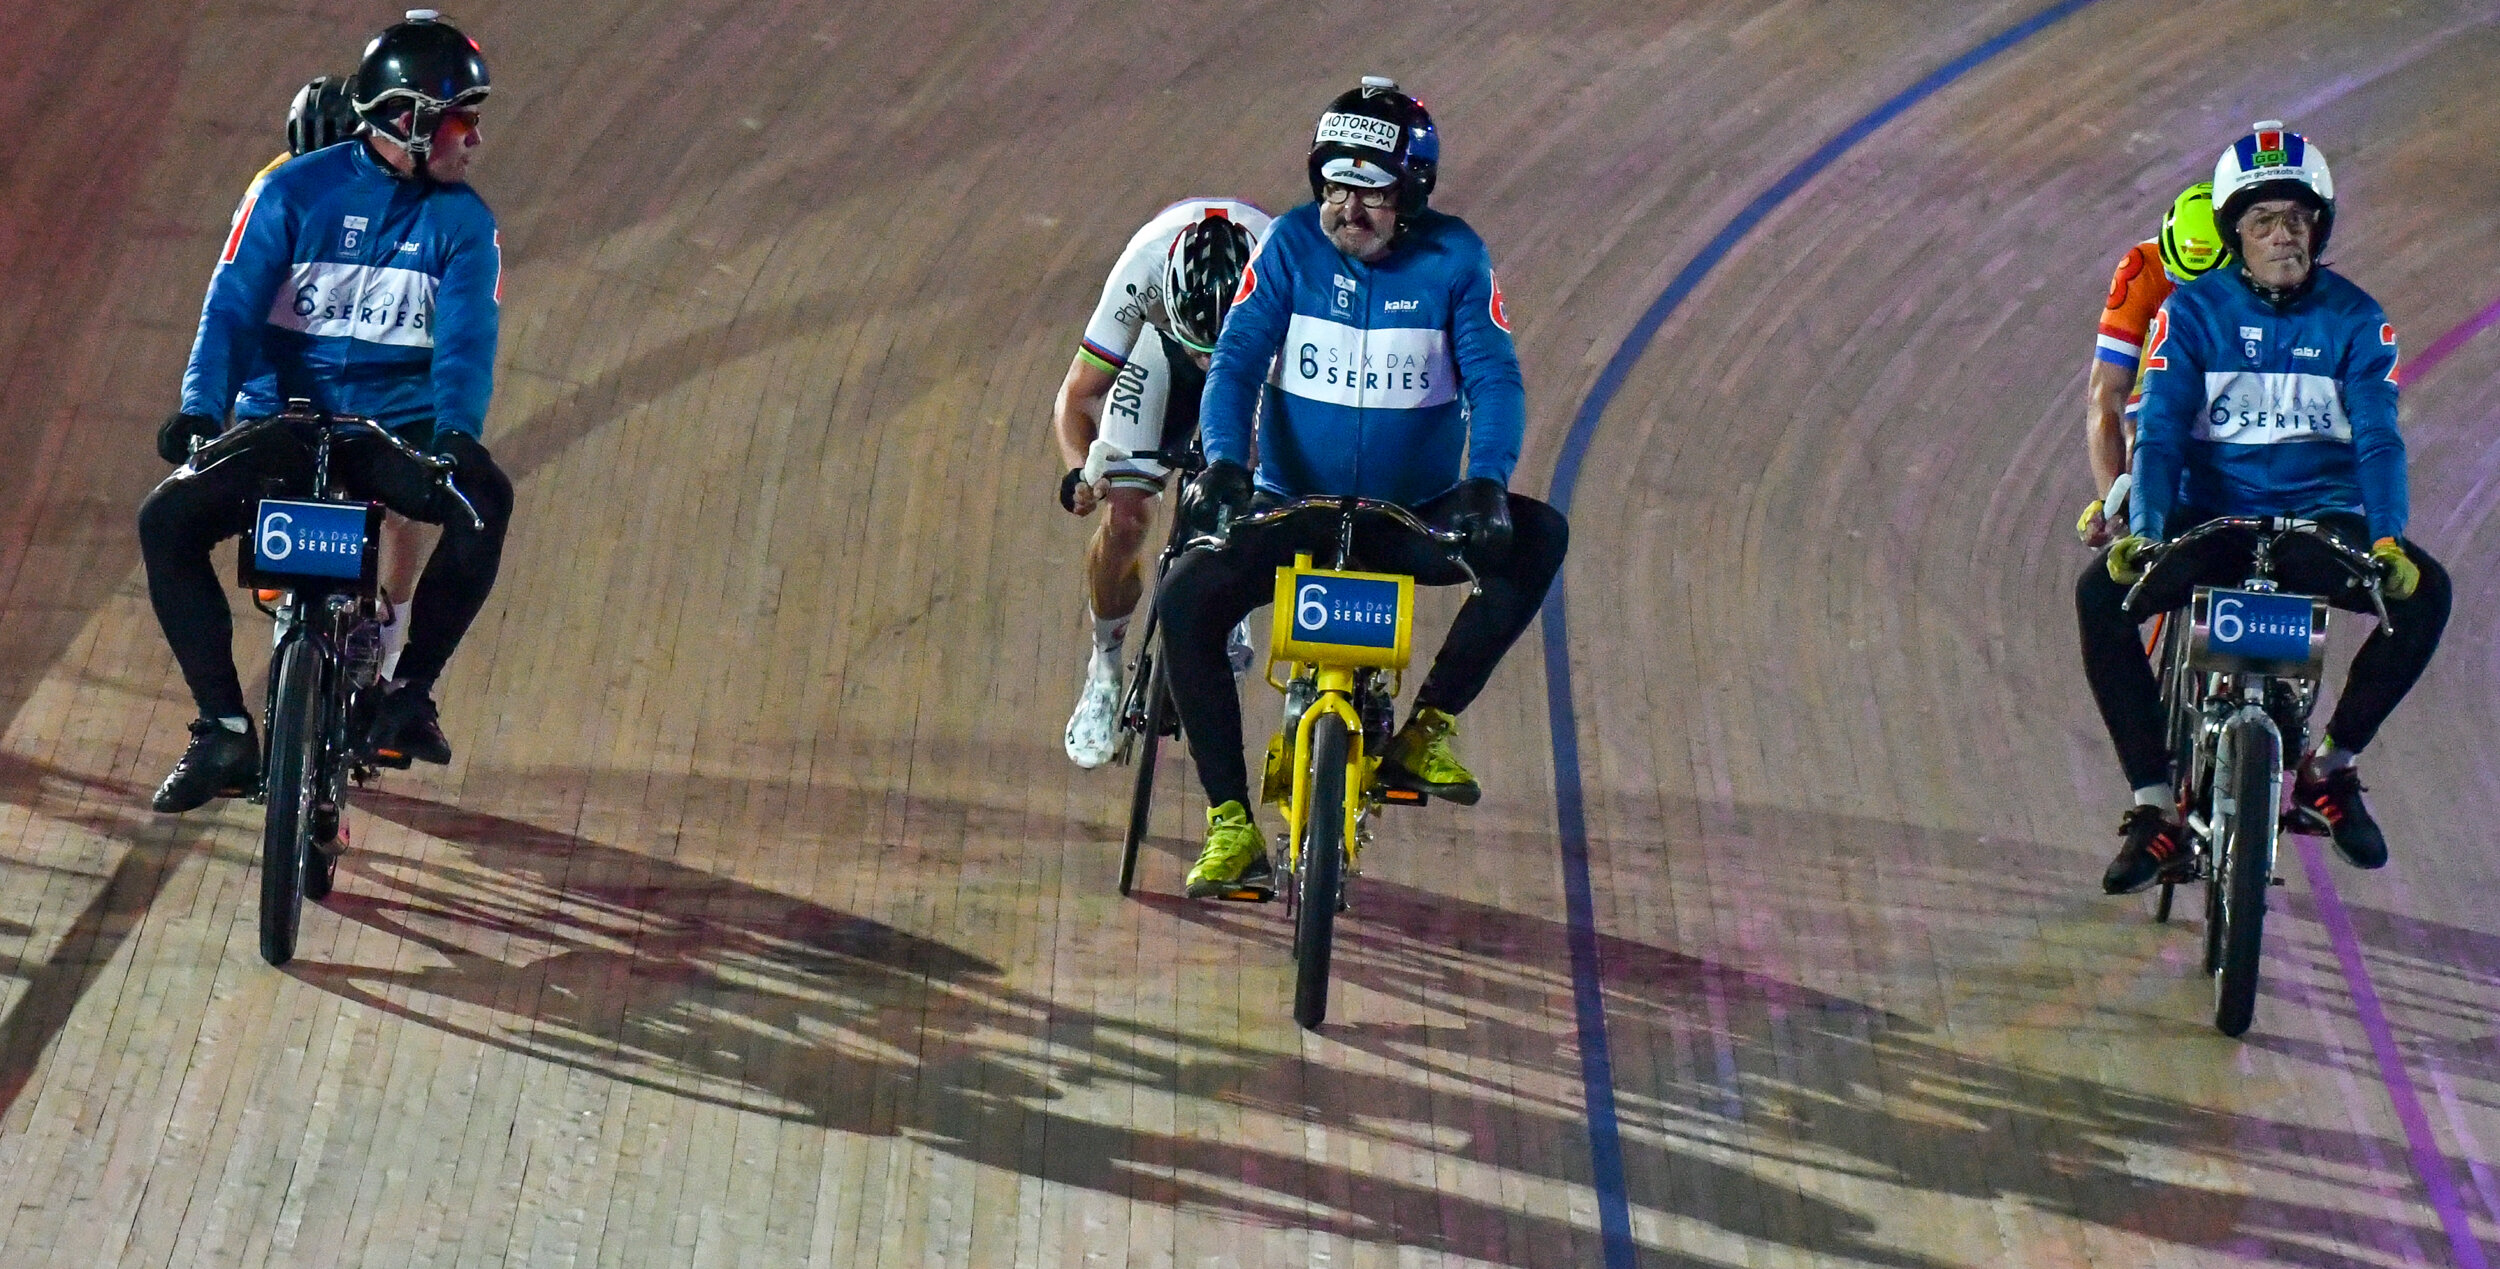
This is very different in character from the Derny, where the competitors ride in the slipstream of a motorised pacer (incidentally, the 6 Day Series website describes the expressions of the derny pacers as ranging from ‘inscrutable’ to ‘very inscrutable’).  In the image below, the emphasis is on the derny riders, rather than the cyclists, in order to convey the character of this race.

(Nikon D500; 200-500mm at 200mm; f/5.6; 1/320th sec; ISO 8000)

(Nikon D500; 200-500mm at 200mm; f/5.6; 1/320th sec; ISO 8000)

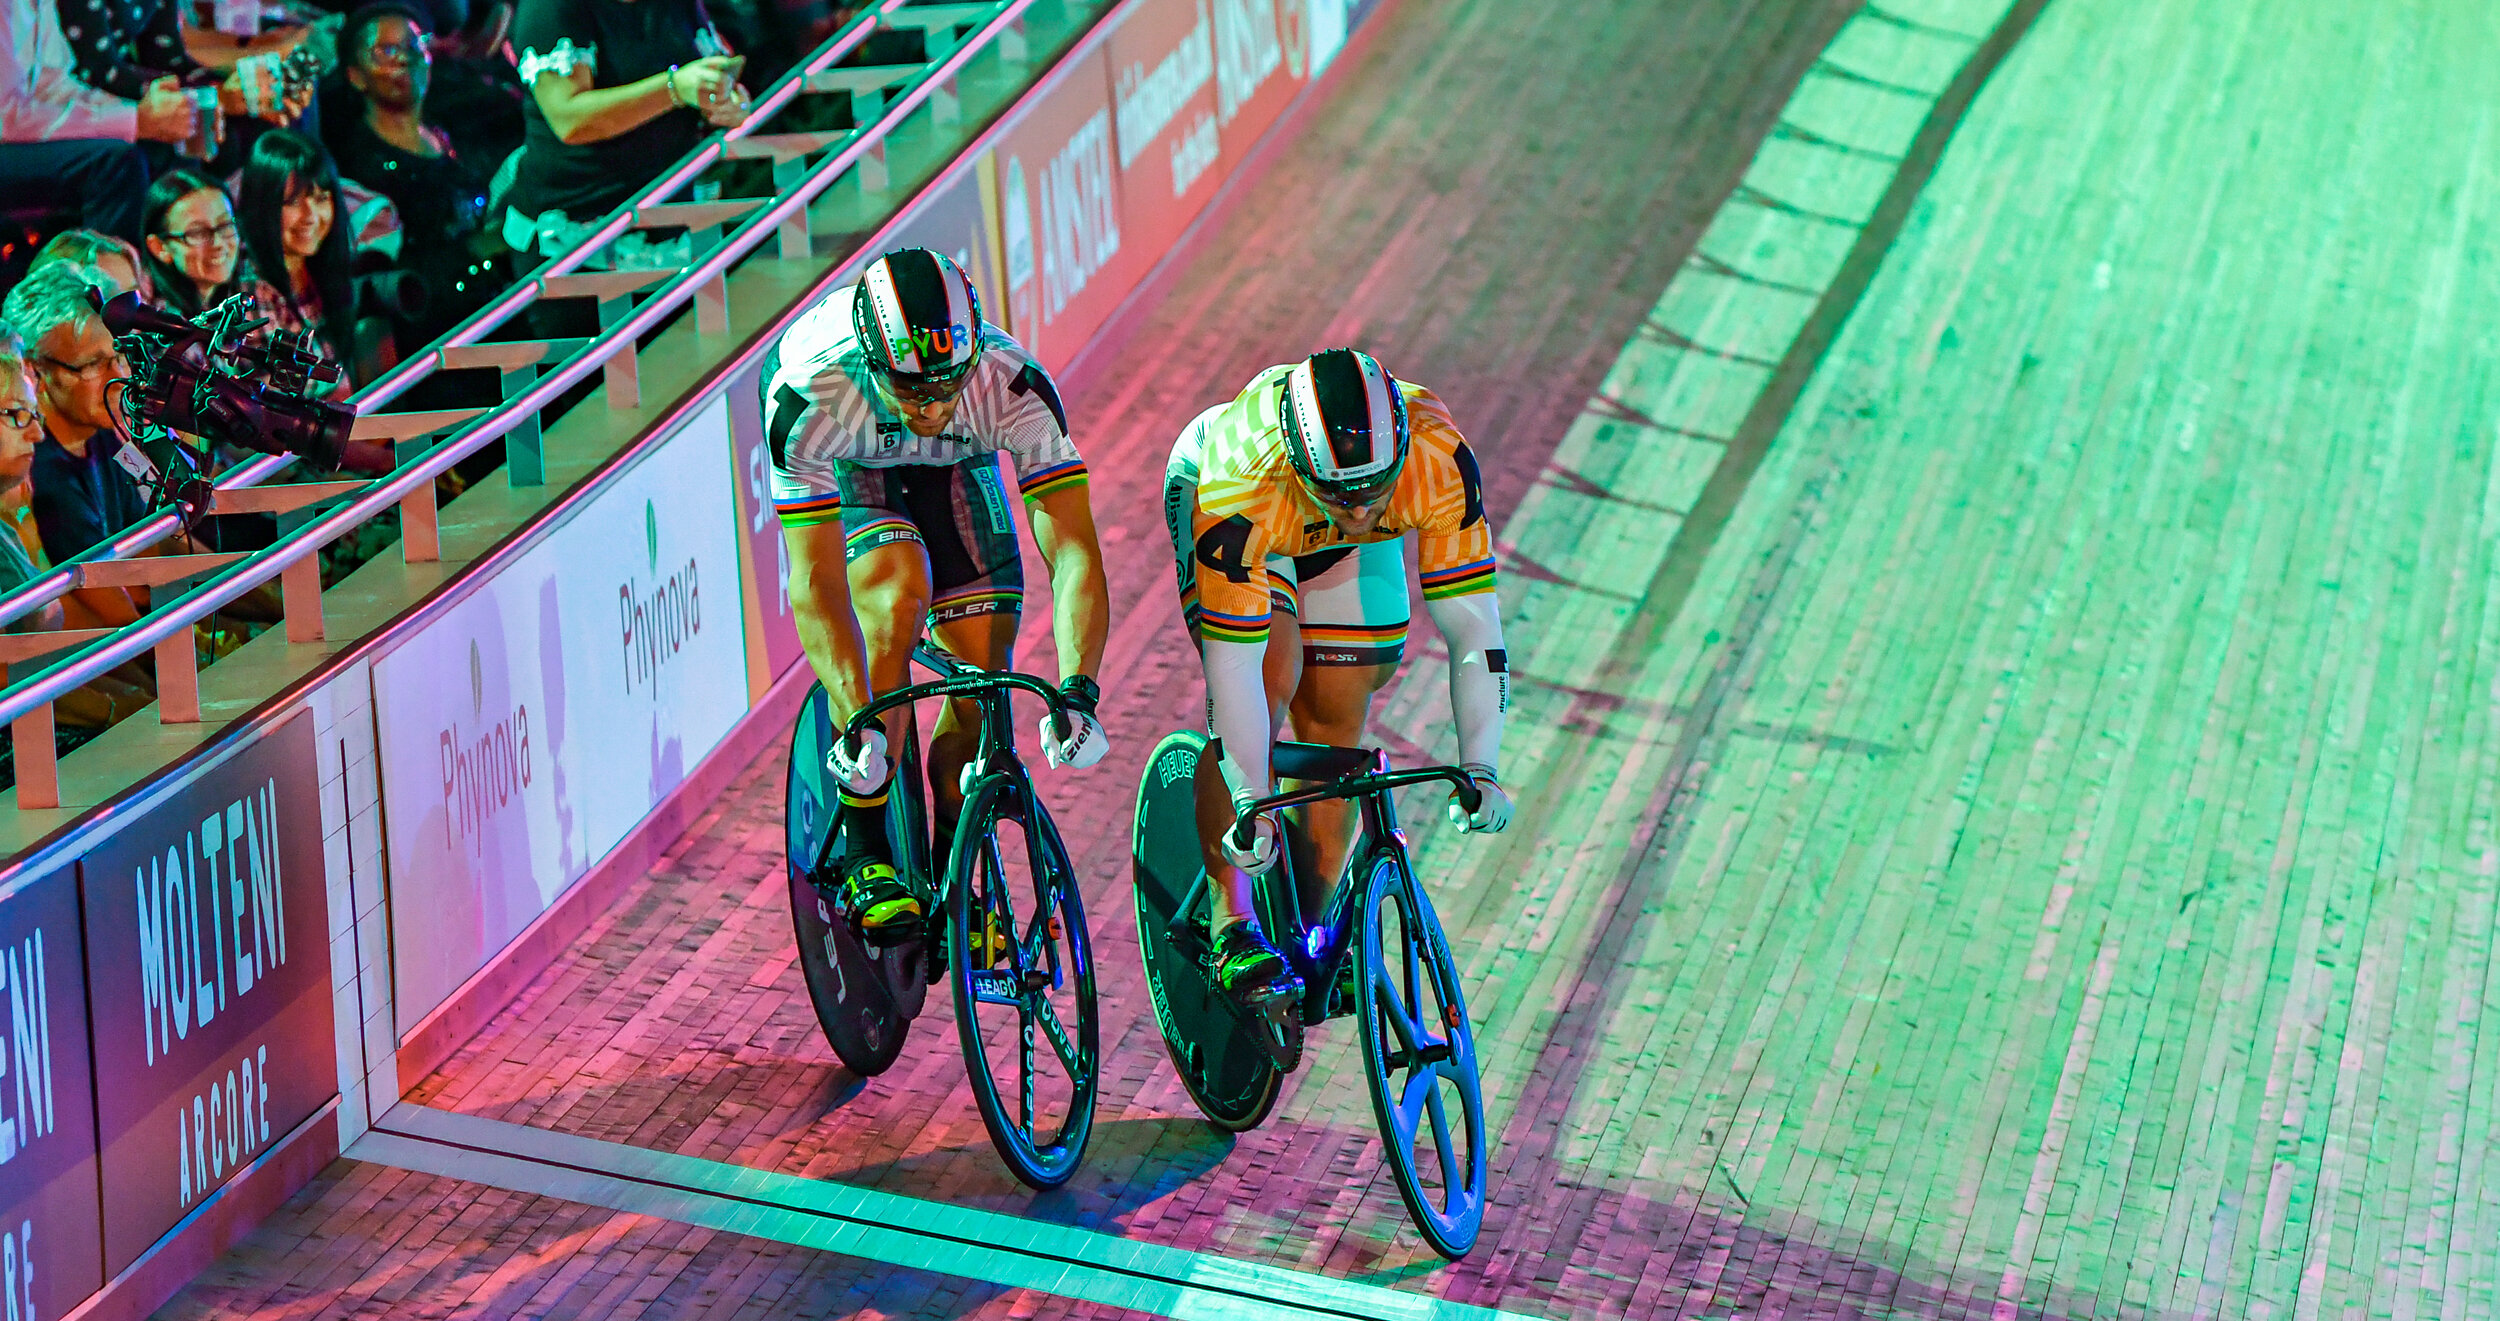
And in the Sprint …  Racing is highly tactical, with the 2 riders vying for position, occasionally leading to both of them executing track stands – i.e. not moving – in order to make the other go first (see below).  This is trying to ‘tell the story’ of how the 2 cyclists are highly competitive and trying to get one over the other – by doing nothing.

(Nikon D500; 70-200mm at 150mm; f/2.8; 1/80th sec; ISO 1600)

(Nikon D500; 70-200mm at 150mm; f/2.8; 1/80th sec; ISO 1600)

As I mentioned at the start, the majority of my sport photography tends to be outdoors and during daylight and, where I have photographed sport indoors, the lighting has been constant.  It was very exciting therefore to photograph an event where the light show was all part of the atmosphere.  The races themselves were conducted with the stadium lights dimmed and the track itself lit, providing great opportunities to play with shadows.

(Nikon D500; 70-200mm at 98mm; f/2.8; 1/400th sec; ISO 800)

(Nikon D500; 70-200mm at 98mm; f/2.8; 1/400th sec; ISO 800)

At the end of each race, spotlights followed the victorious rider around the track on their celebratory lap – see below.  

(Nikon D500; 200-500mm at 200mm; f/5.6; 1/320th sec; ISO 7200)

(Nikon D500; 200-500mm at 200mm; f/5.6; 1/320th sec; ISO 7200)

While the photographers’ positions at the end of the finishing straight gave a perfect view down the track, the images were taken from higher up, which meant that it was more difficult to see the riders’ face, even when they were at the far end of the track.  

By getting down to track level, it was possible to get much closer to the action and, by crouching down, almost to look up at the riders as they went past.

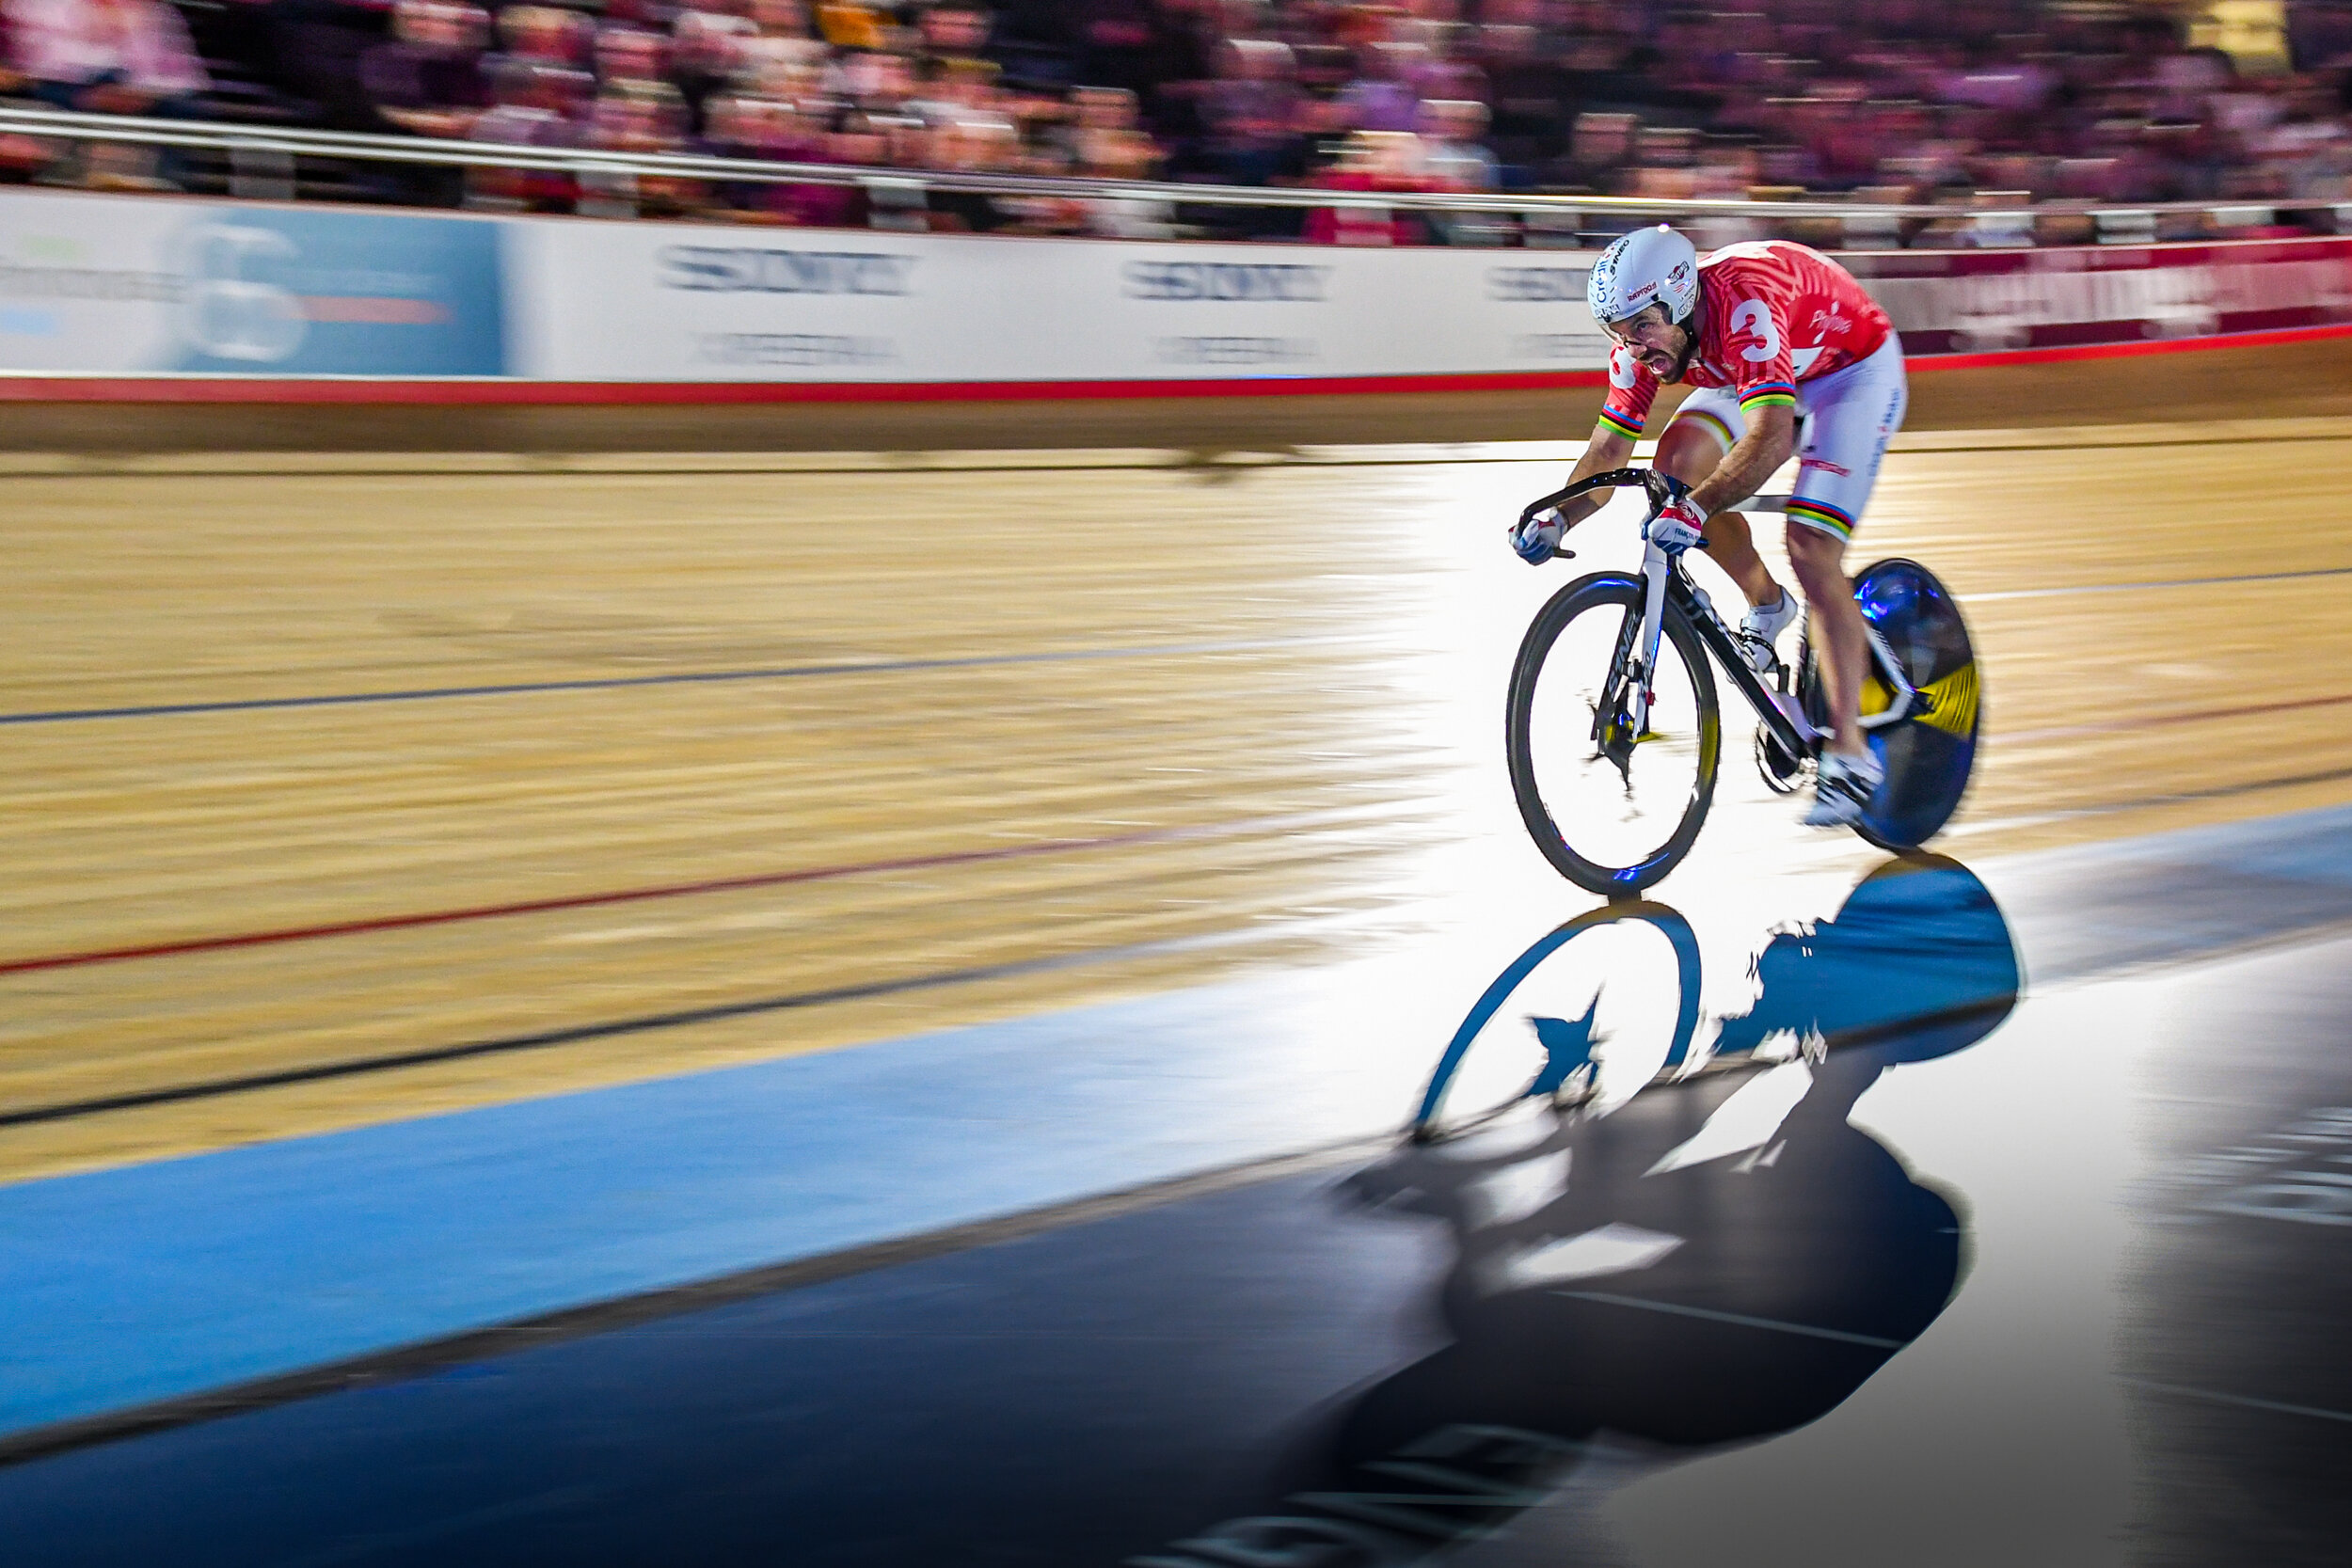
(Nikon D500; 24-70mm at 24mm; f/2.8; 1/100th sec; ISO 1100)

(Nikon D500; 24-70mm at 24mm; f/2.8; 1/100th sec; ISO 1100)

The photograph above was taken with a wide-angle lens, and the rider was only feet away and travelling at speed.  The shutter speed of 1/100th second was enough to provide motion blur, whereas a faster shutter speed would have made it feel more static.  Moreover, taking the image directly into the bright light – on the third – draws the eye to the rider’s face and bicycle … The photo below was taken with the same lens but zoomed in. Again the shadow comes into play.

(Nikon D500; 24-70mm at 70mm; f/2.8; 1/100th sec; ISO 1400)

(Nikon D500; 24-70mm at 70mm; f/2.8; 1/100th sec; ISO 1400)

It is always tempting to lose concentration when the main action is over, but this is often when there are interesting photos to be had.  It is always worth keeping alert – and resist the temptation to review the photographs that you have already taken!

The image below shows the celebratory victory lap and the connection between the rider and the audience.  It brings together interesting lighting, the curves of the track side, and the rider’s colourful clothing to produce an atmospheric shot. 

(Nikon D500; 200-500mm at 240mm; f/5.6; 1/320th sec; ISO 5000)

(Nikon D500; 200-500mm at 240mm; f/5.6; 1/320th sec; ISO 5000)

Both my visits to Lee Valley VeloPark were hugely enjoyable and the photography was extremely rewarding.  As I am not used to photographing in such conditions, the main challenges were to exploit the dramatic lighting to best effect and also to convey the variety of cycling spectacle that is the Six Day Series.

With particular thanks to Six Day London.


If you have enjoyed this blog or if you have any questions/comments, please leave a message in the comments box below.

How to Photograph Ice Hockey

 How to Photograph Ice Hockey 

(All images copyright Michael Berkeley Photography - no reproduction without permission)

I love photographing ice hockey - it is fast, exciting and a spectacle.  I first contacted Swindon Wildcats back in autumn 2017 and they kindly allowed me to photograph the match against the Hull Pirates; and I have been back on 3 further occasions.

Ice hockey isn’t a sport that I know a huge amount about, so I did some research on Google before my first visit to Swindon to find out more about the sport and to see what sort of images other photographers were getting. I found out that some rinks have a ‘photographers’ hole’ – which is a hole in the Plexiglas big enough for a camera lens to go through, thereby providing an uninterrupted view of the action – but I have seen a video where the puck was hit through the hole and injured the photographer badly, so I wasn’t too enthusiastic about that!

(Sony A9II; 70-200mm at 200mm; f/2.8; 1/1000th sec; ISO 1600)

(Sony A9II; 70-200mm at 200mm; f/2.8; 1/1000th sec; ISO 1600)

As it happens, there isn’t a hole at Swindon, so my first task was to find a suitable position from which to shoot.  Following my practice at other ‘end to end’ sports such as football, rugby, polo and basketball, I positioned myself at rink level, on the corner.  This afforded good views down the rink, as well as of the goal – while ensuring that the view through the Plexiglas was not too oblique, as that would have created unwanted reflections.  I also checked that the Plexiglas in front of me didn’t have too many scratches or smears so that the images were as clear as possible.

As I didn’t have a dedicated spot, I ensured that I arrived early to reserve my space before too many spectators arrived.  This proved more of a problem for the ‘local derby’ against Basingstoke on New Year’s Day 2020, as there were many more visiting fans than for the game against Hull back in 2017.  

(Nikon D500; 70-200mm at 122mm - f/2.8; 1/1000th sec; ISO 280)

(Nikon D500; 70-200mm at 122mm - f/2.8; 1/1000th sec; ISO 280)

Also, as a match has 3 periods of 20 minutes each where the teams alternate ends, it is worth positioning yourself at the end that ‘your’ team is attacking in the first period, as you will then have 2 periods where they are primarily skating towards you on the attack.

I used the general principles for camera settings set out in my blog Getting into Sport and Music Photography.  This meant that I set the lens as wide open as possible to reduce the depth of field (normally f/2.8 with the lenses I have); set the shutter speed to a level where I reckoned the puck would be frozen, even when hit at speed (so, at least 1/1000th sec); and put the ISO setting to Auto within max/min limits (although, as the light levels were constant, I reckon I could have set the ISO to one particular level).

(Nikon D500; 18-55mm at 18mm - f/3.5; 1/1000th sec; ISO 900)

(Nikon D500; 18-55mm at 18mm - f/3.5; 1/1000th sec; ISO 900)

I have experimented with a number of different lenses over the 4 games I have covered and, on balance, the 70-200mm zoom is the most versatile if using only one body (I find it difficult swapping bodies at speed, considering how quickly an ice hockey match unfolds).  As far as focussing is concerned, I used continuous-servo AF on the Nikon, with 3D-tracking, which worked well with the fast-moving skaters.

The image above was taken with an 18-55mm lens, however, and the wide angle gives a dramatic perspective when the action is so close.  Note the reflection in the Plexiglas on the right of the image, because I was shooting obliquely through it.

Ice hockey is of course played indoors under lights and this adds the complication of getting the white balance correct, which isn’t such an issue with sports outdoors.  I haven’t found this too much of a problem, especially with the Sony A9II, so I leave White Balance on Auto and I work on this while reviewing the photos on Lightroom back at home.

(Sony A9II; 70-200mm at 200mm - f/2.8; 1/1000th sec; ISO 2000)

(Sony A9II; 70-200mm at 200mm - f/2.8; 1/1000th sec; ISO 2000)

With ice hockey, the action moves at high speed from one end of the rink to the other, and there is often quite a crush around the goal, making it difficult to isolate the action in a photograph that doesn’t have a crowd of players displaying more backs than faces. It’s very similar to basketball in this respect.

In the image above, the camera has picked up the player that I wanted to focus on, even though other players have moved in front of him, so this illustrates how difficult it is to get an uninterrupted view of the player you want to photograph.  I quite like the position of the puck and the sticks, but I am not sure that this is a ‘keeper’.

The easiest time to grab ‘stock shots’ of the players is when they were moving from one end of the rink to the other, because they are facing you, and also they often don’t have opposition players obscuring them (see below).

(Sony A9II; 70-200mm at 200mm - f/2.8; 1/1000th sec; ISO 2000)

(Sony A9II; 70-200mm at 200mm - f/2.8; 1/1000th sec; ISO 2000)

I aim to get a recognisable face, the puck and the stick(s) fully in the picture if possible.  As with other arena sports, the background can be distracting because I am shooting from rink level and the adverts and the spectators therefore come into play.  

In the image below, I have darkened the image in post-production to obscure the spectators.  Maybe it’s the wrong image to use (too much empty space top right), but I find the lack of spectators weird.  As a principle, I feel spectators provide context and atmosphere, although it is good to blur them as much as the lens will allow – hence the importance of making the depth of field as shallow as possible by having the lens wide open.

(Nikon D500; 70-210mm at 70mm - f/4; 1/1250th sec; ISO 560)

(Nikon D500; 70-210mm at 70mm - f/4; 1/1250th sec; ISO 560)

Having photographed players moving from one end of the rink to the other, the next challenge is to capture the goal-mouth action.  As previously stated, this can be tricky with the number of players involved and the speed with which everything happens – but it is not impossible.  Using continuous shooting is also helpful, because that increases the likelihood of capturing the precise moment you want.

As always, the better you understand the sport, the easier it is to anticipate what is going to happen – whether it is shot on goal or when a fight is brewing, which is a part of the game that is immensely popular with the spectators!

In the image below, the Wildcats player in red is facing the camera and the puck is in a good position in relation to the goalie.

(Sony A9II; 70-200mm at 121mm - f/2.8; 1/1000th sec; ISO 2500)

(Sony A9II; 70-200mm at 121mm - f/2.8; 1/1000th sec; ISO 2500)

Part of the challenge is also to capture the emotion of the players - the highs and the lows. In the image below, the concentration and determination on the face of the Wildcats’ attacking player in red is contrasted with the frustration of the Bisons’ defenders who cannot get to the puck. This provides a tension in the picture and starts to tell a story.

(Sony A9II; 70-200mm at 70mm - f/2.8; 1/1000th sec; ISO 2500)

(Sony A9II; 70-200mm at 70mm - f/2.8; 1/1000th sec; ISO 2500)

Ice hockey is a very physical game, often involving hits and altercations between the players – this is just part of the spectacle (see below).  Sometimes these can happen right in front of you, so close in fact that it is not possible to capture them.  

(Sony A9II; 70-200mm at 200mm - f/2.8; 1/1000th sec; ISO 2000)

(Sony A9II; 70-200mm at 200mm - f/2.8; 1/1000th sec; ISO 2000)

Also, there are some good images to be had when a player stops quickly and his skates throw up ice (see below).

(Nikon D500; 70-210mm at 70mm - f/4; 1/1000th sec; ISO 720)

(Nikon D500; 70-210mm at 70mm - f/4; 1/1000th sec; ISO 720)

As always, I am on the lookout for pictures that provide atmosphere, such as the goal celebration and player shots below.  Celebrations in any sport reflect emotion and success, so they are firm favourites with the club involved.

(Sony A9II; 70-200mm at 120mm - f/2.8; 1/1000th sec; ISO 2500)

(Sony A9II; 70-200mm at 120mm - f/2.8; 1/1000th sec; ISO 2500)

(Nikon D500; 70-200mm at 200mm - f2.8; 1/1000th sec; ISO 450)

(Nikon D500; 70-200mm at 200mm - f2.8; 1/1000th sec; ISO 450)

I would jump at the opportunity to photograph ice hockey again.  It is high octane fun – and a challenge photographically to capture images that make artistic sense when the play appears fairly chaotic.  If you get a chance, I would strongly recommend that you give it a go!

With special thanks to Swindon Wildcats.


If you have enjoyed this blog or if you have any questions/comments, please leave a message in the comments box below.